Quickstart Tutorial
Get started with Tracks in under 15 minutes. This tutorial walks you through creating your first project, exploring the generated structure, and making your first changes.
Prerequisites
- Go 1.25 or later
- Make (for running development commands)
- Docker Desktop (for database services)
If you haven't installed Tracks yet, see the Installation Guide.
Step 1: Verify Installation
First, verify that Tracks is installed correctly:
tracks version
You should see the Tracks version information.
Step 2: Create Your First Project
Create a new project called myapp:
tracks new myapp
Tracks will generate a complete project:
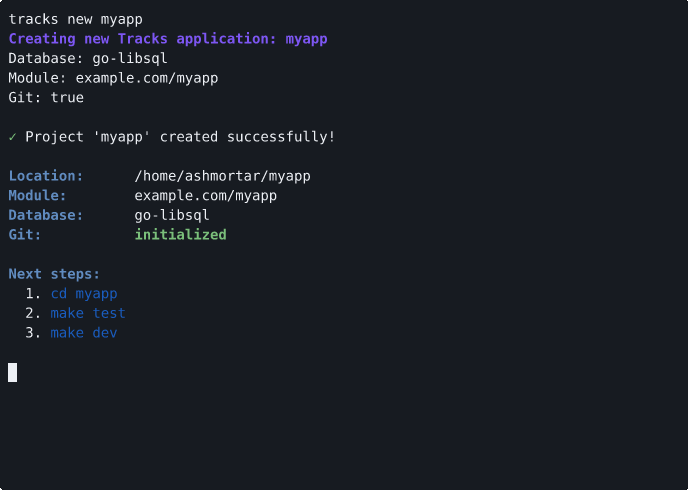
What just happened?
Tracks generated a production-ready Go web application with:
- Clean architecture with layered structure
- Health check endpoint ready to use
- Docker Compose configuration for local development
- Auto-generated
.envfile with sensible defaults - GitHub Actions CI workflow
- All tests passing out of the box
Step 3: Explore the Generated Structure
Navigate into your new project:
cd myapp
Take a look at the generated structure:
ls -la
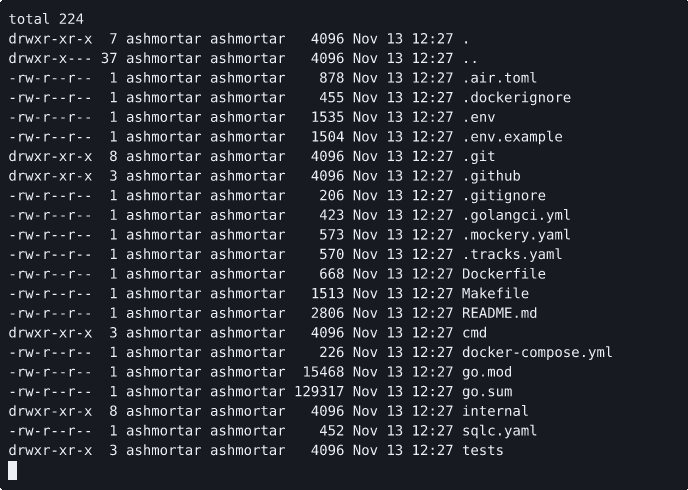
Key directories and files:
cmd/server/main.go- Application entry pointinternal/- All application code organized by layerconfig/- Configuration managementhttp/- HTTP server, routes, handlers, middlewaredomain/- Business logic and servicesdb/- Database connection setup
Makefile- Development commands (dev, test, lint, build).env- Auto-generated environment configurationdocker-compose.yml- Local database services.github/workflows/ci.yml- CI/CD pipeline
For a detailed explanation of the architecture, see the Architecture Overview.
Step 4: Start the Development Server
Start the development server with hot reload:
make dev
The first time you run this, Docker Compose will start the required database service automatically:
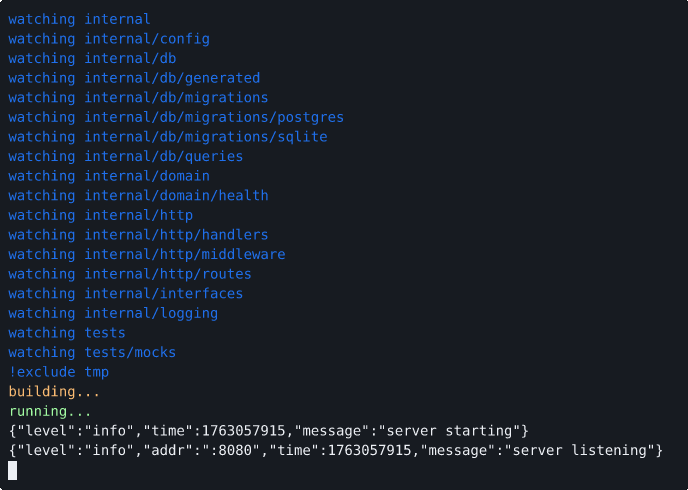
The server is now running on http://localhost:8080 with hot reload enabled. Any code changes will automatically rebuild and restart the server.
Step 5: Test the Health Endpoint
In a new terminal, test the health check endpoint:

This confirms your application is running correctly!
Step 6: Make a Code Change
Let's modify the health endpoint to see hot reload in action.
Open internal/http/handlers/health.go in your editor and find the GetHealth function (around line 20):
func (h *HealthHandler) GetHealth(w http.ResponseWriter, r *http.Request) {
    response := HealthResponse{
        Status:    "ok",
        Timestamp: time.Now().UTC(),
    }

    w.Header().Set("Content-Type", "application/json")
    w.WriteHeader(http.StatusOK)
    json.NewEncoder(w).Encode(response)
}
Add a new field to include the application version. Update the HealthResponse struct (around line 13):
type HealthResponse struct {
    Status    string    `json:"status"`
    Timestamp time.Time `json:"timestamp"`
    Version   string    `json:"version"`  // Add this line
}
And update the handler to set the version:
func (h *HealthHandler) GetHealth(w http.ResponseWriter, r *http.Request) {
    response := HealthResponse{
        Status:    "ok",
        Timestamp: time.Now().UTC(),
        Version:   "1.0.0",  // Add this line
    }

    w.Header().Set("Content-Type", "application/json")
    w.WriteHeader(http.StatusOK)
    json.NewEncoder(w).Encode(response)
}
Save the file. Watch your terminal running make dev - you'll see Air detect the change and rebuild:
main.go has changed
Building...
Running...
INFO Starting HTTP server... port=:8080
Now test the endpoint again:
curl http://localhost:8080/api/health
You should see the new version field:
{
  "status": "ok",
  "timestamp": "2025-11-12T10:35:00Z",
  "version": "1.0.0"
}
Hot reload works! Your changes are live without manually restarting the server.
Step 7: Run the Tests
Stop the dev server (Ctrl+C) and run the test suite:
make test
You'll see output showing all tests passing:
?   	example.com/myapp/cmd/server	[no test files]
ok  	example.com/myapp/internal/config	0.002s
ok  	example.com/myapp/internal/domain/health	0.001s
ok  	example.com/myapp/internal/http/handlers	0.003s
ok  	example.com/myapp/internal/logging	0.001s
All generated projects include tests that verify:
- Configuration loading
- Service layer logic
- HTTP handlers
- Logging setup
You can also run linting to check code quality:
make lint
Step 8: Next Steps
Congratulations! You've created your first Tracks project, explored the structure, made changes with hot reload, and verified everything works with tests.
Where to go from here:
- Understand the Architecture - Read the Architecture Overview to understand the clean architecture pattern
- Explore Layers - Learn about each layer in the Layer Guide
- CLI Reference - See all
tracks newoptions in the CLI Reference - Database Drivers - Learn about database driver choices (LibSQL, SQLite, PostgreSQL)
Coming in Phase 1:
- Code generators for resources, handlers, and services
- Interactive TUI for guided project setup
- Additional scaffolding commands
Troubleshooting
Port Already in Use
If you see bind: address already in use, another process is using port 8080. Either:
Option 1: Find and stop the other process:
# On Linux/macOS
lsof -ti:8080 | xargs kill

# On Windows
netstat -ano | findstr :8080
taskkill /PID <process_id> /F
Option 2: Change the port by setting APP_SERVER_PORT in .env:
APP_SERVER_PORT=:3000
Docker Not Running
If make dev fails with Docker errors, ensure Docker Desktop is running:
- macOS/Windows: Start Docker Desktop from Applications
- Linux: Run
sudo systemctl start docker
CGO Errors (LibSQL/SQLite)
If you chose LibSQL or SQLite and see CGO-related errors, you need a C compiler:
- macOS: Install Xcode Command Line Tools:
xcode-select --install - Ubuntu/Debian:
sudo apt install build-essential - Windows: Install MinGW-w64 or use WSL2
For more troubleshooting, see the Installation Guide.